Administering Insulin to Your Kitty: A Step-by-Step Guide
Gently hold skin near shoulder area, lift a small fold, slide insulin needle into fold at a slight angle, then press plunger slowly. Stay calm, speak softly, and offer praise or a small treat after shot. For clearer steps and confidence-building tips, please go through details below.
Look, managing a diabetic feline isn’t easy—it takes dedication and lots of love. Key to success? Mastering daily injections. This guide covers it all, with practical tips, firsthand stories, and plenty of encouragement to help you tackle it like a pro. You’ve got this!
Understanding Blood Sugar Regulation
Keeping glucose levels balanced is essential for felines with diabetes to stay energetic and comfortable. Before diving into steps, it’s important to understand how proper hormone management impacts overall condition and well-being.
Preparing for Injection
Gather Supplies
Have all necessary items ready—medication vial, syringe with prescribed needle, alcohol swabs, and some treats for positive reinforcement.
Check Medication Vial
Gently roll vial between palms to mix contents evenly. Avoid shaking, since it can create air bubbles.
Set Up a Comfortable Space
Choose a calm, cozy place where both of you can stay relaxed. A peaceful setting helps everything go more smoothly and keeps stress to a minimum.

The Insulin Shot Process
Step-by-Step Guide for Giving a Pet an Injection
Clean Hands Thoroughly
Start by washing hands well with warm water and soap. Scrub for at least 20 seconds, making sure to get between fingers and under nails. This keeps things hygienic and prevents unwanted germs from contacting a furry companion.
Prepare Syringe
Fill syringe with exact amount prescribed by a vet. Point it upward and gently tap side to let trapped air rise. This ensures correct dosage and smooth delivery.
Approach Gently and Reassure
Move in slowly—avoid sudden gestures or loud noises. Speak in a calm, soothing voice and maintain steady tone. Place hand gently on back or behind ears, wherever pet enjoys touch. These small gestures help them feel secure and more likely to stay still during routine.
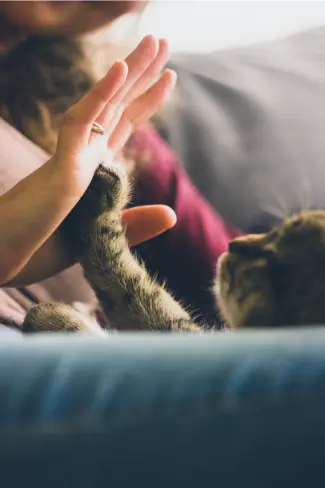
Pinch Neck Area Gently
Find a soft, loose fold of tissue near base of neck, usually between shoulder blades. Lightly lift with thumb and forefinger to form a small tent. This lift creates natural space just beneath surface, making delivery easier and less bothersome.
Administer Injection
Guide needle into tented skin at roughly 45-degree angle, keeping it under surface and away from muscle. Press plunger slowly and steadily to release contents.
Changing Up the Spot: A Key Part of Managing Diabetes in Your Furry Friend
When managing insulin routines for a furry companion, it’s not just about mastering steps—it’s also about being thoughtful with how and where treatment is applied. One popular spot is loose skin just behind a neck. It’s easy to reach and usually causes minimal fuss. But here’s the catch—using one spot repeatedly can lead to changes under skin. Over time, this can make tissue tougher, making it harder for insulin to absorb properly.
Is sticking with a single spot again and again really a good idea? Of course not—gentle switching keeps things balanced and far more comfortable. What happens when one place gets used repeatedly? Hardening can develop beneath skin, slowing how medication settles in. Do all areas absorb medication exactly alike? Not quite—some spots take it in quicker, others a bit slower, so changing locations keeps results steadier over time. And who would enjoy soreness from repeated pokes in one area? No one at all. A little variety here and there makes every injection work more smoothly, turning each moment into something calmer, more reliable, and far easier to manage.
Why Rotate Injection Sites?
Avoiding Skin Thickening from Repeated Use
Is sticking with a single spot again and again really a good idea? Not quite, because repeated use can make skin grow firmer and less responsive over time, and that can reduce how well medicine enters. So what simple change keeps everything working smoothly? Shift location each time a shot is given. That gentle adjustment allows skin a chance to recover between visits and keeps each moment balanced. Could such a small change truly make a difference in comfort and consistency? Absolutely. Moving between spots keeps absorption steady and turns each session into a calmer, easier experience for a beloved furry friend.
Improved Absorption
Does absorption stay identical across every area of a pet’s tissues? Not at all. Some regions take in treatment faster, while others absorb at a slower pace. Why rotate injection spots then? Rotation encourages a steadier, more predictable response from each dose. Can such a simple habit truly matter? Absolutely. Consistent shifting of placement promotes balanced uptake and plays an important role in keeping sugar levels more stable from day to day.
Easing Discomfort
Ever wondered whether switching shot spots over time truly matters? It certainly does. Repeated use of a single area can make that place tender and sensitive. Could moving to a different spot during each visit ease that strain? Absolutely. Shifting location spreads impact, reduces soreness, and keeps tension lower. And can a little variety really transform medicine time? Without a doubt. Gentle changes keep mood calmer, encourage cooperation during each session, and turn those moments into a steadier, more comfortable experience for a furry friend.
| Injection Site | Rotation Order |
| Left hind leg (lateral quadriceps) | 1 |
| Right hind leg (lateral quadriceps) | 2 |
| Left shoulder (triceps) | 3 |
| Right shoulder (triceps) | 4 |
| Left flank (midway between ribcage and hip) | 5 |
| Right flank (midway between ribcage and hip) | 6 |
Commonly Recommended Placement Options:
1. Back of Neck
Many feline guardians choose a spot between shoulder blades for a shot—but what makes that location so appealing? Flexibility plus easy reach make that area practical during a quiet moment with a beloved kitty. Skin there stays naturally loose, so a gentle lift forms a soft fold with little effort. Once that fold rises, what follows next? A tiny pocket appears beneath surface, guiding needle entry with steady precision. Could such a simple position truly influence how calmly everything unfolds? Absolutely. Consistent use of that comfortable area allows medicine to enter efficiently while keeping each moment calmer and far more predictable for a cherished feline friend.
Many find this helpful at first because it allows quick, confident work. Plus, most pets are less sensitive here, which reduces reactions during daily tasks.
Avoid using one point again and again. Over time, repetition can cause tissue to stiffen or trigger mild irritation. Choose nearby points along upper back each time—moving aim one or two inches left or right often changes how it feels.
Could keeping a short note about shot spots across passing days truly make a difference? Absolutely, since memory grows sharper and gentle patterns begin to appear, allowing balance to form with quiet confidence. A tiny record—maybe a few simple words on paper or a quick line saved on a phone—answers one honest question: where did that small moment happen today? Once that answer appears, shifting spots begins to feel natural, pressure spreads more evenly, and comfort remains steady from morning until night. Could such a modest habit reshape experience across time? Without a doubt, since thoughtful tracking protects ease, lowers strain, and turns each moment into a calmer, more reassuring experience.
2. Shoulders and Flanks
What makes shoulder regions or sides near midsection—often called flanks—such appealing spots for repeated shot moments? Soft, flexible skin in those areas allows gentle needle entry and easier positioning. Could using several regions instead of one single point make things simpler over time? Absolutely. Shoulder spots, flank areas, and loose skin behind neck together form a balanced pattern that spreads pressure more evenly. What grows from such a thoughtful approach? Lower risk of irritation, steadier absorption, and shot moments that feel calmer and far more predictable for a beloved furry friend.
Is switching locations during medication time really necessary? It certainly is, because using a single spot repeatedly can make skin grow firmer or overly sensitive as time passes. So what happens when areas along shoulders and ribs are alternated instead? Absorption tends to stay more balanced, while soreness becomes far less likely. Could such a small adjustment influence behavior during each session? Absolutely. Shifting locations regularly keeps each moment calmer, reduces squirming or fuss, and transforms medication time into a smoother, more comfortable experience for a cherished furry friend.
What draws gentle variety into repeated injection moments? A calm rhythm that turns each experience into something steady and familiar. Could a simple shift in location really make a difference? Absolutely—it spreads pressure more evenly and keeps irritation far less likely. What happens as this steady pattern continues over time? A furry friend slowly relaxes, sensing that each injection belongs naturally within everyday life. Nervous tension fades, confidence grows, and every moment feels smoother than before. Might such quiet consistency deepen connection between human and feline friend? Without a doubt. Patience, kindness, and a calm presence transform small acts into reassurance, allowing trust to grow stronger with every shared moment.
3. Area Behind Front Legs – Gentle Alternative
Could another spot make shot moments feel calmer and less stressful? Absolutely. A practical option rests in soft skin tucked just behind front legs. What makes that location appealing? Natural flexibility and gentle looseness allow easy needle entry with very little resistance, keeping everything calm and controlled. Does spot choice truly influence comfort and cooperation? Without question. Selecting a relaxed area eases tension, reduces irritation, and keeps each moment steady from beginning to end. What can such a small change accomplish? A simple adjustment turns shot time into a more predictable experience, bringing quiet reassurance to every step.
Why does calm confidence matter during this step? Because steady hands create a steadier experience. Stay relaxed and focused while working in this area. Lift surface tissue gently with one hand, forming a small tent-like fold that opens a clear path. What about needle placement? A careful angle close to 45 degrees allows entry just beneath upper layer without excess pressure. Should force ever be used here? No—light, controlled motion keeps things comfortable while staying clear of muscle, guiding process with precision and ease from start to finish.
Could another spot bring relief after recent use elsewhere? Absolutely, and that quiet little area often goes unnoticed even though it performs beautifully when other regions have seen recent attention. Why keep a brief record of each spot used? A small note answers that instantly, guiding thoughtful switching so repeated pressure or irritation stays unlikely. What happens if redness or sensitivity appears in another region? Confidence remains strong, because this gentle alternative waits patiently as a reliable choice, preserving comfort and allowing each session to flow calmly from one moment to the next.
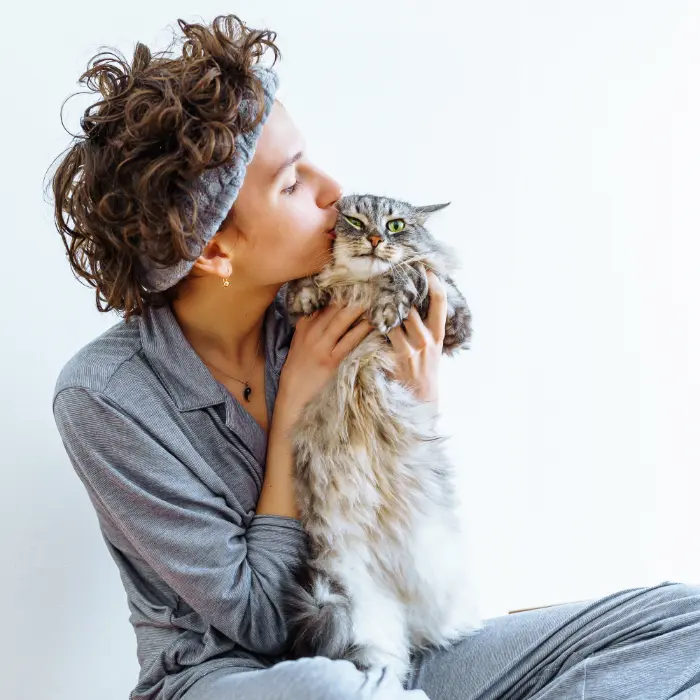
Ever wondered if a little praise or a tiny snack after a shot truly changes anything? It absolutely can. A warm word or a small treat right after that moment sends a powerful signal—everything is okay, everything feels safe. Could such a gentle gesture shape future reactions? Without a doubt. Kindness right after each moment builds trust, easing nerves and inviting calm cooperation next time. And does that simple reward really make a lasting difference? Of course it does. Over time, those small celebrations turn each moment into something familiar and comforting, allowing a furry friend to accept each session as a natural, peaceful part of life.
Tips for Effective Site Rotation:
Ever wondered whether a clear plan truly matters during shot moments with a furry friend? It absolutely does. Steady patterns create comfort and build trust over time. Could a simple schedule with gentle shifts in spots across several days make injections smoother and more balanced? Without a doubt. Spacing areas evenly reduces irritation and keeps each moment calm and predictable. And can such a small habit really shape a better experience? Absolutely. Consistent habits bring quieter moments, fewer surprises, and growing confidence, allowing a beloved feline to stay relaxed while every shot unfolds with gentle assurance.
Track Placement Patterns
Make it a habit to note exactly which locations get used each time a dose goes in. Keeping a clear log prevents overuse of any single point and lets each region rest. Over time, this practice can limit surface irritation and make things easier for them during long-term use.
Consult a Veterinarian
Why pause before making changes in a kitty’s daily rhythm? Because trusted expertise brings clarity and quiet confidence. Could guesswork ever match insight from a trained veterinarian who understands individual needs, past history, and current condition? Not at all. Would a quick consultation truly influence important decisions? Absolutely. Professional advice offers direction, steadiness, and peace of mind, allowing every step forward to feel thoughtful, gentle, and reassuring for a cherished feline friend.
Rotate Injection Sites
What makes changing shot spots so meaningful once regular medication becomes part of life with a beloved feline? Repeating one location again and again may bring irritation and gradually interfere with steady absorption. Could a gentle shift in location from one moment to another create a real difference? Absolutely. Spreading each shot across several areas allows sensitive skin to stay comfortable while medicine enters more reliably. Might such a small adjustment shape a calmer experience for both a caring human and a cherished cat? Without a doubt. Consistent change brings balance, keeps each moment steadier, and turns a simple act into quiet reassurance—an expression of patience, kindness, and lasting love for a treasured feline.
Personal Experience: Facing the Initial Hurdles
John, a pet parent from California, shares early struggles. He says he worried about making him uneasy at first. His vet explained loose tissue near shoulder region makes shots far less bothersome. Trusting advice let him relax and feel more confident.
Post-Administration Care
Handling Used Needles Safely
Once finished with a shot, never drop used needles or syringes into regular trash. Place used items inside a puncture-proof sharps container. Such containers protect everyone—family members, sanitation workers, curious pets—from accidental pricks. Proper disposal keeps home safe and encourages responsible habits. When container reaches capacity, take it to a local pharmacy or biohazard disposal facility. One small step makes a real difference.
Rewarding a Furry Friend: A Moment of Joy
Once a task is done, it’s a perfect moment to celebrate with a whiskered buddy. Offer a favorite crunchy snack or spend a few minutes playing a preferred game. Positive follow-up helps companions associate routine with treats, affection, and bonding. Over time, this builds trust and makes daily care smoother for both of you.
Stay Observant
Why watch closely for subtle changes in mood, energy, or reactions? Because small signals often speak first. Notice signs like limping, flinching, hiding, or refusal of food—each one may point toward something not quite right. What should happen when unusual behavior appears? Prompt contact with a veterinarian brings clarity and guidance. Staying attentive keeps a furry companion comfortable and at ease, ensuring well-being remains a top priority through every stage of routine.
Case Study: Bella’s Remarkable Journey
Meet Bella, an adorable Siamese who faced a tough battle with her condition. Her devoted owner, Emily, embraced responsibility for managing treatment. This journey wasn’t just about care—it became a meaningful bonding experience for both.
Emily’s steady attention and emotional support worked wonders for Bella. Now, whenever Bella sees a treatment syringe, she starts purring—a sweet reminder of their strong connection.
Bella’s transformation shows how compassion and love can make a real difference in overcoming challenges.
Conclusion
Now listen up, friend, ’cause it’s time to talk ’bout givin’ shots to a sugar-sensitive kitty. It might feel a tad overwhelming at first, but no need to get rattled. With a bit of know-how and plenty of compassion, this can turn into a positive moment for both of ya.
Here’s how it goes: every kitty comes with a one-of-a-kind personality. Spend time learnin’ habits, favorites, and little quirks. Shape routine around what feels right for ’em. Think of it like a short, smooth dance—step in, step out, all done.
And here’s truth worth holdin’ onto, partner: consistency reaches far beyond managing a condition. What does steady effort really say to a furry companion? It quietly whispers, “It’s handled. No worry here.” Every calm moment, every careful step builds trust and deepens connection. Does dedication like that matter? Absolutely. Presence speaks louder than words, and that steady commitment shows up day after day. So keep goin’, friend. Effort continues, confidence stays strong, and that quiet promise of reliability means far more than it might ever seem.
Now, if ya need more tips or got any other questions, just holler, eh?